前回の記事の最後に、「属性やタグに囲まれた内容を利用できません」と書きました。
今回はその続きで、昔のプロジェクトでページ描画に使われいているものを念頭に作っていきます。
このテクニックを応用することで、 Spring Thymeleaf を JavaScript 化することができるのではないかと思います。
サンプルプロジェクトはこちら
やること
またもやこんな感じの HTML ファイルを用意して、内容が不変な独自定義タグ <x-note> と <x-paragraph> と可変な <y-button> の内容を挿入・入替します。
タグで囲まれた内容もしっかり置き換えられるよう、アルゴリズムを考慮する必要があります。
index.html1
2
3
4
5
6
7
8
9
10
11
12
13
14
15
16
17
18
19
20
21
22
23
24
25
26
| <!DOCTYPE html>
<html lang="en">
<head>
<meta charset="UTF-8">
<title>Title</title>
<style>
.red {
color: red;
}
.component-y-button {
border: 1px dotted blue;
padding: 5px;
}
</style>
</head>
<body>
<x-paragraph></x-paragraph>
<y-button id="abc" foo="bar">d<span class="red">e</span>f
<x-note></x-note>
g
<y-button id="zyx" foo="buz">h</y-button>
i
</y-button>
</body>
</html>
|
<y-button> の定義はこんな感じです。
y-button.html1
2
3
4
5
| <div id="{{bind.attrs.id}}" class="component-y-button {{bind.attrs.foo}}">
<div>{{bind.children}}</div>
<x-paragraph></x-paragraph>
<button>Click!</button>
</div>
|
適当に考えましたが、 {{hoge}} のような構文を使うところは Jinja2 っぽくはあるかもしれません。
config
前回と異なり、入れ子構造のタグも考慮にいれなければなりません。
前回は “html-loader” を使っていましたが、 ‘component-loader.js’ が HTML(テンプレート)を JavaScript に変換するので、これは必要なくなります。
webpack.config.dev.js4
5
6
7
8
9
10
11
12
13
14
15
16
17
18
19
20
21
22
23
24
25
26
27
28
29
30
31
32
33
34
35
36
37
38
39
40
41
42
43
44
45
| const commonOptions = {
prefixes: ['x-', 'y-'],
paths: [path.resolve(__dirname, './src/components')],
fileExt: '.html'
};
module.exports = {
mode: "development",
entry: {
'index': path.resolve(__dirname, './src/pages/index.html')
},
output: {
path: path.resolve(__dirname, 'public')
},
module: {
rules: [
{
test: /src.pages.[\w-]+\.html$/,
use: ExtractTextPlugin.extract({
use: [
{
loader: "./dev/page-loader.js",
options: commonOptions
}
]
})
},
{
test: /src.components.[\w-]+\.html$/,
use: [
{
loader: "./dev/component-loader.js",
options: commonOptions
}
]
}
]
},
plugins: [
new ExtractTextPlugin("[name].html"),
]
};
|
ページ用とコンポーネント用で loader が(入り口だけ)異なりますが、対象となるコンポーネントを参照する設定を共通にしています。
loader
ページ用とコンポーネント用で 2 つありますが、この例ではほぼ同じです。ページ用では、下のコードから置き換え用の処理を除いているだけです。
dev/component-loader.js6
7
8
9
10
11
12
13
14
15
16
17
18
19
20
21
22
23
| module.exports = function loader(source) {
if (this.cacheable) {
this.cacheable();
}
const options = loaderUtils.getOptions(this);
source = source.replace(/\${/g, "\\${").replace(/`/g, "\\`");
source = source.replace(/{{bind\.attrs\.(\w+)}}/g, "${attrs.$1}");
source = source.replace(/{{bind\.children}}/, "${children}");
const $ = cheerio.load(source, {xmlMode: true});
postOrderProcess(this, $, options);
const raw = $.html({xmlMode: true});
return `module.exports = (attrs, children) => \`${postProcess(raw)}\``;
};
|
ここでは別のメソッドに切り出していますが、 postOrderProcess がキモとなります。名前の通り、木構造の走査として後順で処理を行っています。
こうすることで、子要素がコンポーネントへと置き換えられる前に文字列化されてしまうという問題は起きません。(後順の場合には、親要素はすべての子孫要素が処理された直後に処理されるため。)
post-order-process.js4
5
6
7
8
9
10
11
12
13
14
15
16
17
18
19
20
21
22
23
| function postOrderProcessForTag(node, func) {
node.children.filter(n => n.type === 'tag').forEach(n => {
postOrderProcessForTag(n, func);
});
func(node);
}
module.exports = function (context, $, options) {
postOrderProcessForTag($.root().get(0), (n) => {
if (options.prefixes.some(p => n.name.startsWith(p))) {
const componentName = n.name;
const passingOptions = {'name': componentName, ...options};
const request = componentRouter(context, passingOptions);
$(n).before(`\${require(\`${request.slice(1, -1)}\`)(${stringifyForStringInterpolation(n.attribs)},\`${$(n).contents() || "\\`\\`"}\`)}`);
$(n).remove();
}
});
};
|
" 等、文字列が cheerio にエスケープされないよう注意が必要です。
コード中に出てくる stringifyForStringInterpolation と postProcess は、 JSON のプロパティ名として ````` が使えないため、エスケープされてしまう " を仮の文字に変換して処理を行った上で文字列変換を行うようにしています。
まとめ
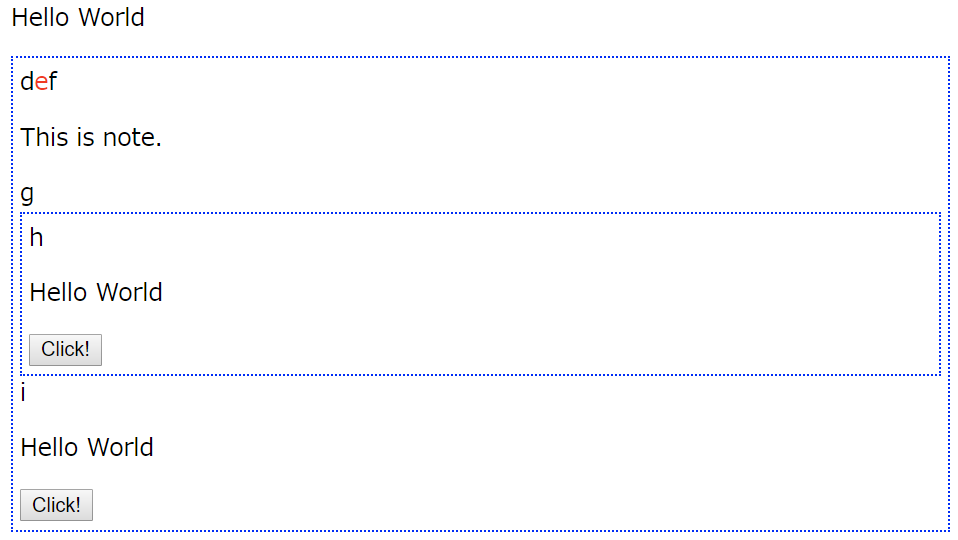 実行結果
実行結果
HTML など、 JavaScript で定義されていないコンポーネントを Webpack を用いて JavaScript の関数として利用する例を紹介しました。
入れ子構造になっている場合に注意すべきことを紹介しました。